How to change consumables for your Brother Printer or MFD.
A4 Mono Printers and MFDs
Including models - HL-6400DW and MFC-L6900DW
Changing Toner
- Open the front cover
- Remove the toner cartridge and drum unit assembly
- Remove the empty toner from the drum
- Inser the new toner into the drum
- Clean the corona wire inside the drum unit
- Install the toner cartridge and drum assembly back in the printer
- Close the front cover
Changing the drum
- Make sure that the machine is turned on.
- Open the front cover.
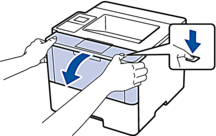
- Remove the toner cartridge and drum unit assembly from the machine.
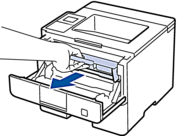
- Push down the green lock lever and take the toner cartridge out of the drum unit.
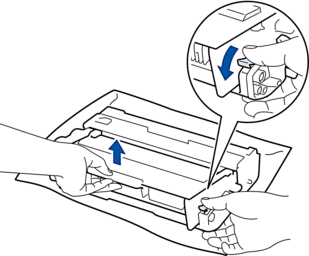
- Unpack the new drum unit.
- Put the toner cartridge firmly into the new drum unit until you hear it lock into place.

- Clean the corona wire inside the drum unit by gently sliding the green tab from left to right and right to left several times.
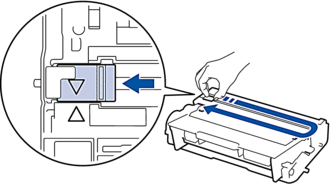
- Install the toner cartridge and drum unit assembly back into the machine.
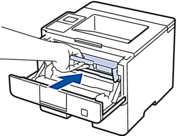
- Close the front cover of the machine.
A4 Colour MFDs
Including model - MFC-L9570CDW
Changing Toner
-
Make sure the machine is turned on.
-
Press the front cover release button and pull open the front cover.

-
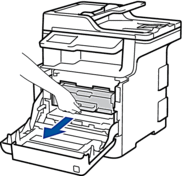
Hold the drum unit's green handle. Pull the drum unit out of the machine until it stops.
-
Hold the handle of the toner cartridge and gently push it away from you to unlock it. Pull it up and out of the drum unit. Repeat this for all toner cartridges.

-
Clean the corona wire inside the drum unit by gently sliding the green tab from left to right and right to left several times. Repeat this for all the corona wires.
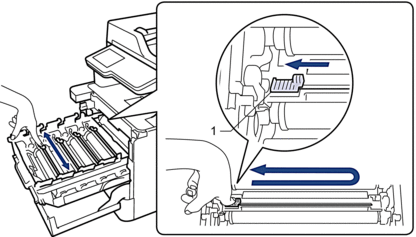
 To avoid poor print quality, be sure to lock the green tab into the home position (1), flush left with the left side of the drum.
 -
Unpack the new toner cartridge.
-
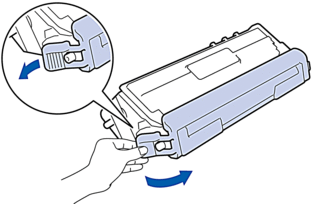
Remove the protective cover.
-
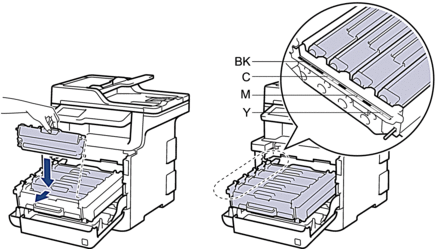
Insert the toner cartridge into the drum unit and gently pull it toward you until you hear it lock into place. Make sure that you match the toner cartridge color to the same color label on the drum unit. Repeat this for all toner cartridges.
-
BK: Black
-
C: Cyan
-
M: Magenta
-
Y: Yellow
Make sure you put the toner cartridge in correctly or it may separate from the drum unit. -
-
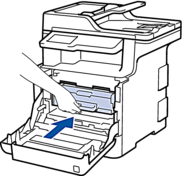
Using the green handle, push the drum unit back into the machine until it locks in place.
-
Close the machine's front cover.
Changing Drum
- Make sure the machine is turned on.
- Press the front cover release button and pull open the front cover.

- Hold the drum unit's green handle. Pull the drum unit out of the machine until it stops.
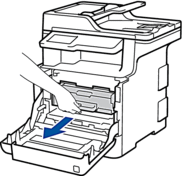
- Turn the green lock lever (1) counterclockwise until it locks in the release position. Holding the green handles of the drum unit, lift the front of the drum unit and remove it from the machine.
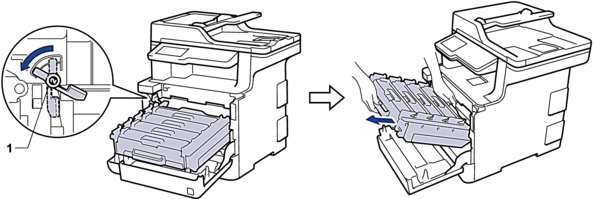
Hold the green handles of the drum unit when you carry it. DO NOT hold the sides of the drum unit.
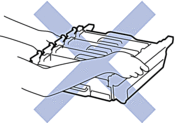
- Unpack the new drum unit.
- Remove the protective cover.
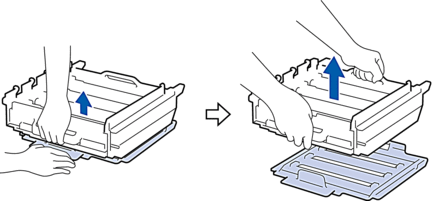
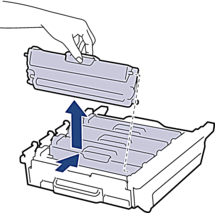
- Hold the handle of the toner cartridge and gently push it away from you to unlock it. Pull it up and out of the drum unit. Repeat this for all toner cartridges.
- Reinsert the toner cartridge into the new drum unit and gently pull it toward you until you hear it lock into place. Make sure that you match the toner cartridge color to the same color label on the drum unit. Repeat this for all toner cartridges.
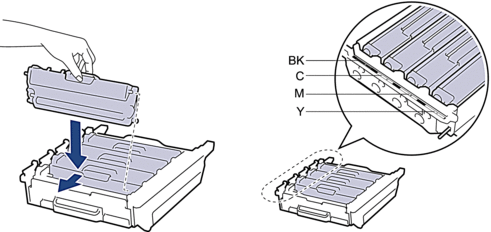
Make sure you put the toner cartridge in correctly or it may separate from the drum unit.
- Make sure the green lock lever (1) is in the release position, as shown in the illustration.
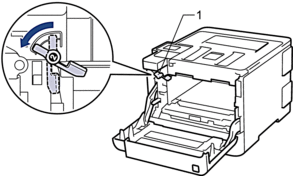
- Gently slide the drum unit into the machine until it stops at the green lock lever.

- Turn the green lock lever clockwise to the lock position.
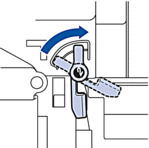
- Using the green handle, push the drum unit back into the machine until it locks in place.
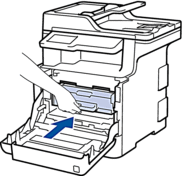
- Close the machine's front cover.
Waste toner box
-
Make sure the machine is turned on.
-
Press the front cover release button and pull open the front cover.
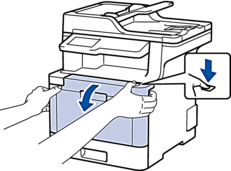
-
Hold the drum unit's green handle. Pull the drum unit out of the machine until it stops.

-
Turn the green lock lever (1) counterclockwise until it locks in the release position. Holding the green handles of the drum unit, lift the front of the drum unit and remove it from the machine.
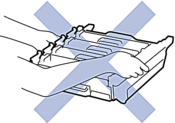
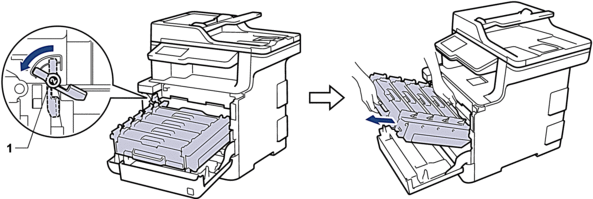 IMPORTANT
Hold the green handles of the drum unit when you carry it. DO NOT hold the sides of the drum unit.
-
Hold the green handle of the belt unit with both hands and lift the belt unit up, then pull it out.
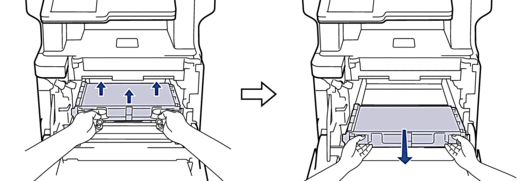 NOTE To avoid print quality problems, DO NOT touch the shaded parts shown in the illustrations.
-
Remove the two pieces of orange packing material and discard them.
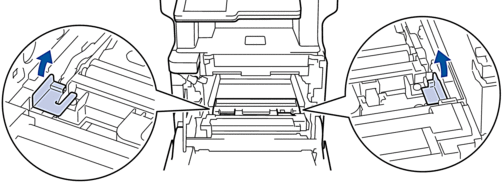 This step is only necessary when you are replacing the waste toner box for the first time, and is not required for the replacement waste toner box. The orange packing pieces are installed at the factory to protect your machine during shipment.
 -
Hold the blue handle of the waste toner box and remove the waste toner box from the machine.
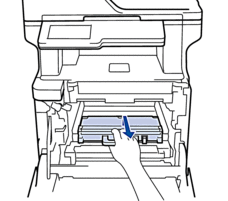 DO NOT reuse the waste toner box.
 -
Unpack the new waste toner box and install the new waste toner box in the machine using the blue handle. Make sure the waste toner box is level and fits firmly into place.
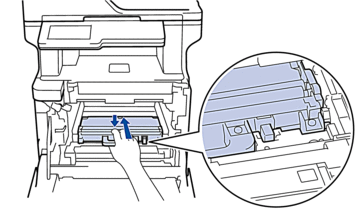
-
Slide the belt unit back into the machine. Make sure the belt unit is level and fits firmly into place.
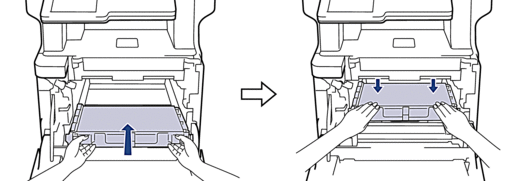 NOTE To avoid print quality problems, DO NOT touch the shaded parts shown in the illustrations.
-
Make sure the green lock lever (1) is in the release position, as shown in the illustration.
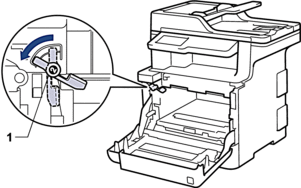
-
Gently slide the drum unit into the machine until it stops at the green lock lever.
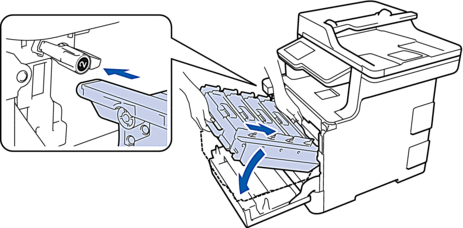
-
Turn the green lock lever clockwise to the lock position.
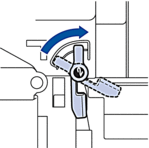
-
Using the green handle, push the drum unit back into the machine until it locks in place.

-
Close the machine's front cover.
Replace the belt unit
-
Make sure the machine is turned on.
-
Press the front cover release button and pull open the front cover.

-
Hold the drum unit's green handle. Pull the drum unit out of the machine until it stops.

-
Turn the green lock lever (1) counterclockwise until it locks in the release position. Holding the green handles of the drum unit, lift the front of the drum unit and remove it from the machine.
 IMPORTANT
Hold the green handles of the drum unit when you carry it. DO NOT hold the sides of the drum unit.

-
Hold the green handle of the belt unit with both hands and lift the belt unit up, then pull it out.

-
Unpack the new belt unit and install the new belt unit in the machine. Make sure the belt unit is level and fits firmly into place.
 NOTETo avoid print quality problems, DO NOT touch the shaded parts shown in the illustrations.
-
Make sure the green lock lever (1) is in the release position, as shown in the illustration.

-
Gently slide the drum unit into the machine until it stops at the green lock lever.

-
Turn the green lock lever clockwise to the lock position.

-
Using the green handle, push the drum unit back into the machine until it locks in place.

-
Close the machine's front cover.
